Good afternoon
The dishwasher is 6 years old, works in 2 wash mode / almost every day. Recently, water began to appear in the pan, which causes error E15. After removing the water, the machine can work normally for several days, then the water accumulates and again the error occurs.
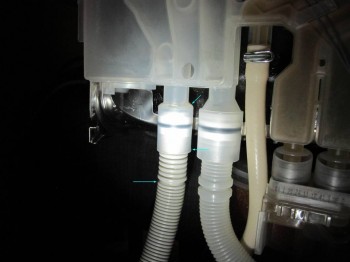
Inspection found that a couple of minutes after the start of the program, individual drops of water begin to flow between the left wall and the heat exchanger, falling from above onto the pipes through which The water is drained, then through the hoses into the pan.
This is what it looks like:
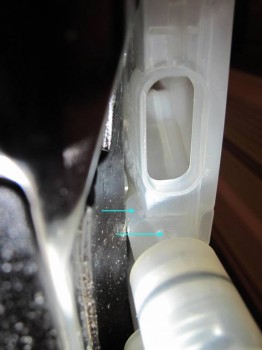
The leak itself is not visible, but it very much looks like it is a hole that connects the dishwasher chamber and some outlet channels on the heat exchanger. The hole is located approximately above the place where the water flows onto the pipes. After the washing starts, a small amount of water (a layer of about 1 cm) gets into this hole, it hangs there, and soon begins to flow.
Direction of droplet movement (heat exchanger is not mine):
I am not trying to remove the heat exchanger yet, because... It’s not the new plastic parts and rubber bands that you’ll have to worry about; this is fraught with breakdowns and new leaks.
Actually questions for more experienced comrades:
1. Based on your experience, is such a leak likely, or is it most likely something else leaking?
2. I’m currently thinking about unscrewing the round grille through which the machine’s chamber and the heat exchanger channels are connected (#00611314), inspecting the rubber gasket, and depending on the situation, sealing it with silicone or replacing it. There is no special tool for unscrewing it, it’s plastic, I’m afraid to break it - what’s the best way to unscrew it?
Thanks in advance
PMM Bosch SMI65M65RU/32 - leak between the wall and the heat exchanger ⇐ Bosch
-
Monty
- Total posts: 1
- Joined: 18.07.2017
Re: PMM Bosch SMI65M65RU/32 - leak between the wall and the heat exchanger
Because There are no answers, I had to repair it at my own discretion.
What I did:
1. I poured WD-40 into the gap between the round lid and the tank and left it overnight.
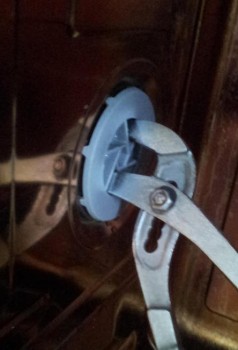
2. The next day, I inserted crooked pliers into the lid grille, as shown in the photo, and with some force unscrewed it (and it moved clockwise, i.e., tightened). The main thing here is to apply force strictly to rotation, so as not to break the grille.
3. I unscrewed the two screws on the outside of the heat exchanger, unfastened its latches on the sides, and gradually tore the heat exchanger away from the wall of the tank (it stuck to the thermal insulation).
4. The rubber gasket became clearly visible. I cleaned, degreased its edge and applied sanitary silicone sealant to the joint with the tank. Be careful, the edges of the tank are sharp!
5. I pressed the heat exchanger back, snapped it into place, made sure that the sealant came out along the entire perimeter of the gasket, and wiped off the excess. I lubricated the thread with fabric softener so that it would not resist tightening, and screwed the lid back on. I think it’s a little tighter than it was. I tightened the screws from the outside.
The leak in this place disappeared. I hope this is useful to someone.
-
Yuri
- Интересующийся

- Total posts: 23
- Joined: 04.09.2017
Re: PMM Bosch SMI65M65RU/32 - leak between the wall and the heat exchanger
It’s enough to just tighten it up. I can say this with complete confidence, since it has been tested by time and gained experience.
-
klexey
Re: PMM Bosch SMI65M65RU/32 - leak between the wall and the heat exchanger
Stupid question, but should I tighten it in the same way (with pliers) and counterclockwise, or is there a hex hole in the center, then through it?
-
- Similar Topics
- Replies
- Views
- Last post
-
- 2 Replies
- 26487 Views
-
Last post by Cuth
 Mobile version


